Description
Benefits
Three models – DMS Go+ Basic, DMS Go+ and DMS Go+ Advanced
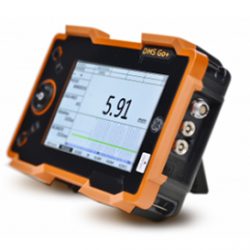
- Ergonomic design for easy operation
- High performance thickness measurement
- High capacity data recorder and compatibility with powerful data management systems
Key Features
- Intuitive arrow-keypad for positive digital control of parameters
- A “Flip” function allows use by both left-handed and right-handed operators
- Portrait or landscape views to match user preference
- A large, 800×480 pixel, display screen, ergonomically sized to reduce eyestrain, which can be adjusted to provide optimum visibility in various ambient light conditions
- Small size, lightweight (870g, 1.9lb), robust construction to IP67 for operation in harsh environments
- Automatic gain control for excellent repeatability and corrosion monitoring
- Built-in temperature compensation for accurate measurement up to 540°C (1000°F)*
- Save and load parameter sets for easy recall and repeatability from inspection to inspection
- On-board data recorder, with capacity of thousands of thickness readings, with storage of A-scan, B-scan and MicroGrid attachments*. The DMS Go+ and DMS Go+ Advanced models offer expanded data recording capability with additional boiler, custom grid, custom linear, custom point, and 3D, & 4D file structures via UltraMATE
- Data transfer is by SD card or via USB port to PC. Data can be transferred in various file formats to allow easy integration with user data management systems
- Export data in multiple file formats (e.g. CSV, PDF, DAT, XML, JPG screen capture)
- Compatible with many of the popular mechanical integrity risk-based inspection data management analysis programs. SDK (software development kit) available to link to other software programs
Typical Applications Includes:
Oil & Gas
- Inspection and monitoring of corrosion in tubes, vessels and tanks;
- Measurement of remaining wall thickness through paint coatings.
Aerospace
- Maintenance checks
Metals Industry
- Thickness measurement of austenitic materials
Power Generation
- Inspection of complex geometry tubes;
- Monitoring of boiler efficiency by measuring oxide scale in boiler tubes with special probe OSS-10.
| Display |
|
| Size (W x H x D) | 175 x 111 x 50 mm / 6.88 x 4.37 x 1.96” |
| Weight | 877 g / 1.87 lbs. |
| Protection class | IP 67 |
| Operating temperature | 0 – 55 °C / 32 – 131 °F |
| Battery |
|
| Power adapter / charger | 100 – 240 V AC, 50/60 Hz |
| Probe connector | Dual Lemo-00 (T/R) |
| PC interface | Micro USB |
| Memory card | SD-Card 16 GB max |
| Data recorder
(model specific) |
|
| Pulser |
|
| Pulse Repetition Frequency | 4, 8 or 16 Hz selectable |
| Receiver (model specific) |
|
| Measurement range | 0,4 – 14,000 m (0.01 – 551”) |
| Units | mm, inch, μs |
| Digital display resolution | 0,01 mm or 0,1 mm (0.001” or 0.01”) selectable |
| Measurement techniques
(model specific) |
|
| Calibration
(model specific) |
|
| Display mode
(model specific) |
|
| Compliance |
|


